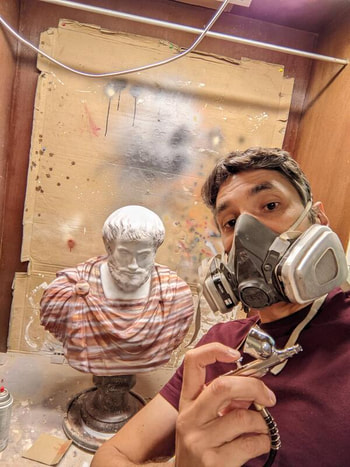
 Being a philosophy teacher and an art lover, I wanted to a bust of Ludovisi's Aristotle in the Museo Nazionale Romano (it's on the cover of so many of our texts!). However, I really wanted to get as close to life size as possible so I had to scale ScanTheWorld file to the right size. While I could not find the exact dimensions, I found posted dimensions for the head of Lysippos' Aristotle which this was likely a copy of. Once scaled, I found that I could carefully slice the bust to print a complete head on my Ender3. From there I had to slice the alabaster bust into 12 parts with the pedestal base as a single piece. I then added alignment pins to all the sliced pieces. I started with 1 large cubic alignment for the head and the pedestal before switching to smaller cylindrical alignment pins within the bust. The large cubic pin allowed me to: 1) separate the bust from the pedestal for ease of transport; 2) easily open the base to fill it with concrete (making the final bust less top heavy). From there I sliced all the files using Cura's "lightning infill" (which remarkably looked neurons inside Aristotle's head!) to save on filament. Overall very little supports were needed and I was able to print everything with ~2,000kgs of filament (not including discarded errors, like accidently printing the same piece 2x). Once all the pieces and the alignment pins, I assembled and glued all the pieces together, spot puttied the seams, and sanded. Some layerlines are still visible since I had to balance smoothness and loss of detail in his hair, beard, etc. In the paint booth, I primed the bust and then painted the head a cooler marble color (I even tried to replicate the brown cracking around the nose). Then I bagged Aristotle like you see in movies and masked off his neckline to airbrush orange, browns and whites to imitate alabaster. Once satisfied I sealed him with a clear coat. Now he sits in my office at DeSales University for students coming in for office hours!
1 Comment
Creating a game based on math was a unique challenge since it needed to be playable with enough character variation to be interesting and yet simple enough for children (e.g. all solutions were whole numbers that appeared on the multiplication table).
The way the game works is each character is a proxy for a number 1-12. After rolling a die to see how many spaces their character advances/retreats along the board (the yardstick), they must multiply the value on the die by their character's number to see how much damage they inflict on their opponent (e.g. if Mario is #7 and they roll a 3, he performs 21 damage). This number is added to any existing damage for a total (e.g. existing damage of 14 + 21 new damage = 35) which is then divided by their characters number to derive how many spaces the opponent is knocked back (35 / 7 = 6 spaces). Since the damage is restricted to sums of multiples of the character's assigned number, the total damage will always appear on the multiplication table. A character wins once they have knocked their opponent off the board! To further incentivize play, I decided the character figures needed to look really cool! Since I am constantly having to reglue characters, I think the game is a success.
|
Out of the Library & into the WorkshopI relax by "getting into my hands." From design, to building, to painting, I love turning ideas into reality. It all started when my father showed me how to build a bookshelf. Here is a sampling of projects I have engaged in to relax and rewind. ArchivesCategories
All
|

 RSS Feed
